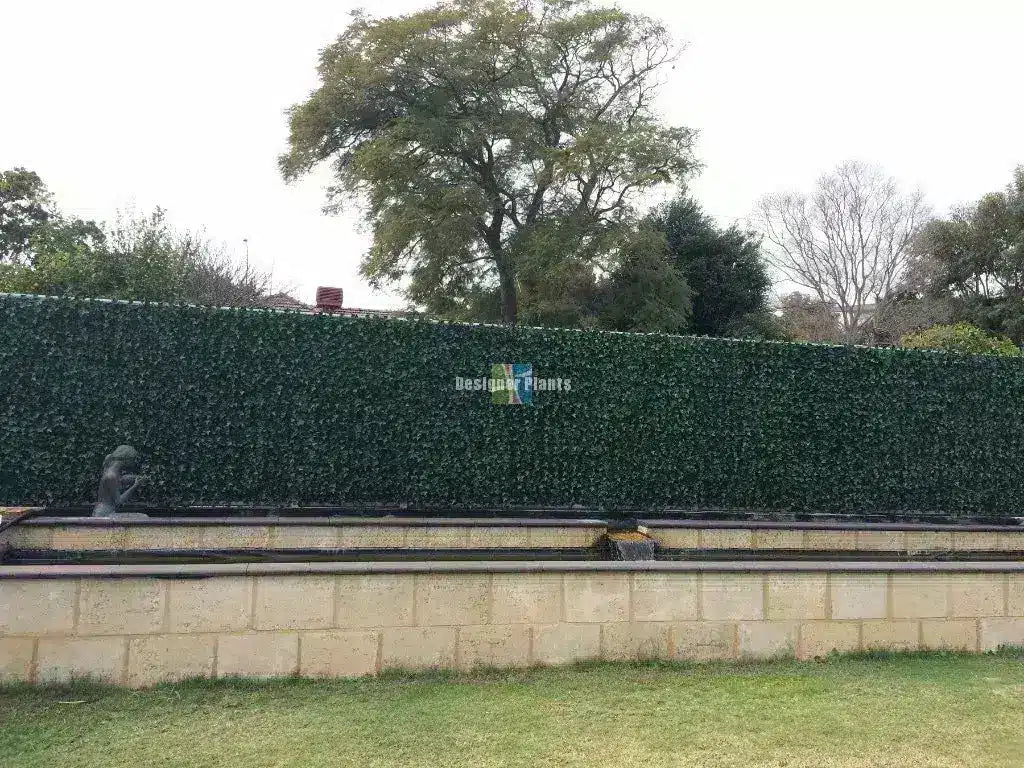
Colorbond® steel is one of the most common backyard fences in Australia, and it is the fence we get asked about most. The question is nearly always the same: how do you attach artificial hedge panels to a Colorbond fence without screwing straight through into your neighbour's yard?
The answer is timber battens. Screw a row of treated pine battens into the near side of the fence cap, then fix your green wall panels to the timber. Nothing goes through the steel sheet, no fixings protrude on your neighbour's side, and you get a straight, solid frame that holds the panels flat for years.
Below is the exact method used on a real install in Madeley, WA, plus the tips our team shares with customers who ask.
Why you shouldn't screw straight through a Colorbond fence
Most Colorbond fences are shared boundary fences. A screw driven through the sheet comes out on the other side, leaving sharp tips and holes in your neighbour's side of the fence. It is also hard to undo cleanly if you ever move or replace the panels.
Battens solve this. Each batten is screwed through the timber into the near side of the fence cap only, using screws short enough that they can't pass through both sides of the cap and poke out on your neighbour's side. The panels then fix to the timber, so every other staple and screw goes into wood.
That neighbour-safe result depends on screw length, so check it against your batten and cap before you start. Because it is a shared fence, it is still worth a quick chat with your neighbour too.
Real install: 20 Green Tropics panels in Madeley, WA
This customer in Madeley, Western Australia covered his steel fence with 20 panels of Luxury Green Tropics, about 20m² of foliage, using the batten method below. Green Tropics is a UV-resistant 1m x 1m panel with tropical leaves layered at different depths, so it reads as a planted garden rather than a flat screen, even on a long fence run in full sun.
What you'll need
| Item | Notes |
|---|---|
| UV-resistant green wall panels | 1m x 1m panels such as Green Tropics. Fences in the sun need UV-rated outdoor panels only. |
| Treated pine battens | Outdoor-rated (H3) treated pine, cut to the height of the fence. One every 50cm on a standard site, or about every 30cm on windy sites or where possums are likely to climb. |
| Screws for the battens | Long enough to pass through the batten and into the near side of the fence cap, but not long enough to reach the far side. Check the length before you start. |
| Staple gun or drill | For fixing panels to the battens. Staples are fastest on timber. Use screws with washers on windy or exposed sites. |
| Tape measure, level, marker | For planning the layout, batten spacing, marking cuts and keeping the first row straight. |
| Scissors or snips | To cut through the backing mesh when trimming panels to height and width. |
| UV protection spray (optional) | Artificial plant UV protection spray as an extra layer of external protection. Follow the label instructions. |
How many panels and battens do you need?
Measure the length and height of your fence in metres. Each panel covers 1m², and a standard 1.8m Colorbond fence takes two rows of panels: a top row of full panels and a bottom row trimmed to height.
Take a 10m long × 1.8m high fence. Its area is 18m², but the two-row install uses 20 one-square-metre panels before trimming: 10 full panels across the top and 10 across the bottom, each bottom panel trimmed to 80cm. If your fence length isn't a whole number of metres you'll trim the end panels too, so round up. Our coverage calculator can do the maths.
For battens, allow one every 50cm plus one to finish the run, so a 10m fence needs 21 battens. At about 30cm spacing for windy or possum-prone sites, the same fence needs 35.
Also allow for depth. The foliage often projects about 15cm from the panel backing, plus the thickness of the battens, so check clearance for paths, gates, side access and garden beds before you start.
What to do with the offcuts
Trimming the bottom row of a 1.8m fence leaves narrow 20cm strips. These aren't ideal for building another full-size feature wall, because joining lots of narrow strips together can look disjointed. They do work well as a continuous strip of greenery along the base of a retaining wall, or to hide an unattractive narrow gap elsewhere in the garden.
Step by step: installing panels on a Colorbond fence
Step 1: Plan the layout before you cut anything
Measure the full length and height of the fence face you want to cover, and sketch where each panel will sit. On a 1.8m fence, the top row stays as full 1m panels and the bottom row is trimmed to 80cm. Along the run, work out how many full panels fit and where any part panels will go: at the less visible end, or split between both ends so the run looks balanced. Planning first means your cut edges and joins land where they look neatest.
Step 2: Fix the battens to the fence cap
Starting at one end, fix treated timber battens vertically every 50cm along the run, or about every 30cm on windy sites or where possums are likely to climb. Screw through the timber into the near side of the fence cap only. The screws must not be long enough to pass through both sides of the cap and protrude on your neighbour's side. Put a batten at each end of the run so cut edges have timber to fix to, and check each batten with a level as you go.
Step 3: Trim the bottom row to suit the fence height
Measure from where the top row will finish down to the bottom of the fence. On a 1.8m fence that leaves 80cm for the bottom row. Mark the cut line on the back of each bottom panel, following a line of the backing mesh so the cut stays straight, then cut through the backing mesh with scissors or snips. Trim from the bottom edge so the clips along the top edge still connect to the panel above.
Step 4: Connect the top and bottom panels
Clip each top panel to the trimmed panel below it using the clips and lugs along the edges, so the foliage lines up as one continuous sheet. Make sure every panel faces the same direction so the leaves flow naturally.
Step 5: Fix the top edge into the timber first
Lift the joined panels into place and fix the top edge to the battens first. With the top secured, the panel hangs straight while you fix the rest, including the trimmed bottom edge, which should be secured to the battens along its full width. Staple or screw into the timber only, never through the Colorbond sheet.
Step 6: Keep going along the fence
Join the next set of panels to the first, then fix them to the battens. Keep the first row level as you build across, because a crooked start shows on a long fence.
Step 7: Trim the end panels to suit the width
Measure the remaining gap at both the top and bottom of the fence, as fences aren't always perfectly square. Mark the cut line on the back of the panel along the backing mesh, cut through the mesh, and fix the cut edge securely to the end batten. If you planned to split the part panels between both ends, repeat at the other end.
Step 8: Fluff the foliage
Run your hands through the leaves to lift them after packaging. This also hides the joins, cut edges and any staple heads.

12 tips for a clean Colorbond install
| # | Tip | Why it matters |
|---|---|---|
| 1 | Never screw through a shared Colorbond sheet | Battens fix into the near side of the fence cap, and the panels fix to the battens. |
| 2 | Check your batten screw length first | Long enough to grip the near side of the cap, short enough that nothing protrudes on your neighbour's side. |
| 3 | Space battens 50cm apart, or about 30cm when needed | Closer spacing gives extra support on windy sites or where possums are likely to climb. |
| 4 | Allow about 15cm for foliage depth | The leaves project from the panel backing, so check clearance for paths, gates and garden beds. |
| 5 | Use outdoor-rated treated pine | It holds up to Australian sun and rain. |
| 6 | Plan the layout before you cut | Cut edges and joins land where they look neatest. |
| 7 | Start at one end and keep the first row level | A crooked start shows on long fence runs. |
| 8 | Fix the top edge first | The panel hangs under control while you fix the rest, including any cut edges. |
| 9 | Staples for speed, screws and washers for wind | Exposed and high-wind sites need a stronger hold. |
| 10 | Only use UV-rated outdoor panels | Check the product page says UV resistant. UV protection spray adds an optional extra layer. |
| 11 | Fluff the foliage when you finish | Hides joins, cut edges and staple heads. |
| 12 | Put offcuts to work | Narrow strips suit the base of a retaining wall or a narrow gap, rather than a second feature wall. |
Can't fix anything to your fence?
Some estates, retirement villages and rental agreements don't allow anything attached to a boundary fence. In that case, a freestanding green wall is the way to go. We cover that method in Installing an Artificial Green Wall Without Damaging the Fence.
After design ideas rather than install steps? See 6 ways to spruce up Colorbond fence colours. For mesh and cyclone fences, see how to install artificial hedges on a cyclone fence.
Colorbond install FAQs
-
Can you attach artificial hedges to a Colorbond fence without anything coming through on your neighbour's side?
-
Yes. Screw timber battens into the near side of the fence cap only, using screws that aren't long enough to pass through both sides of the cap, then fix the panels to the battens. Nothing goes through the sheet or protrudes on your neighbour's side. If you can't fix anything to the fence at all, use a freestanding setup.
-
How far apart should the battens be?
-
Every 50cm on a standard site. Where there is extra wind exposure, or possums and other animals are likely to climb the wall, space them closer at about 30cm for additional support.
-
How far will the panels stick out from the fence?
-
The foliage often projects about 15cm from the panel backing, plus the thickness of your battens. Allow for this when planning around paths, gates and garden beds.
-
How do I cut the panels to fit my fence?
-
Plan the layout first, then measure and mark the cut on the back of the panel along the backing mesh and cut through the mesh with scissors or snips. Trim the bottom row to suit the fence height and the end panels to suit the length, then fix every cut edge securely to the battens.
-
What can I do with the offcuts?
-
Narrow offcuts aren't ideal for a second full-size feature wall, as joining lots of