
Standing in your backyard, staring at that lifeless concrete wall. We've all been there. The barbecue's going, friends are over, and there it is – that ugly slab of nothing, stealing joy from your outdoor space like an uninvited guest.
But what if that eyesore could become the most captivating feature of your entire property? What if it could transform completely as day turns to night, giving you two distinct outdoor experiences for the price of one?
That's exactly what happened when we took on a recent Sydney backyard renovation using our Lush Spring panels and some clever lighting tricks like LED wall art. Let's break down the journey from drab to fab – and how you can pull off the same magic in your outdoor space.

Let's not sugarcoat it – the starting point was grim. A basic outdoor entertaining area with all the charm of a parking garage. The wall itself was structurally fine but aesthetically... well, it wasn't doing anyone any favours.
In Australian backyards, these blank walls create multiple problems:
- They reflect scorching heat during summer (making your deck feel like a frying pan)
- They offer zero visual interest during daylight
- They vanish into a black void after sunset
- They make your outdoor space feel unfinished and neglected
The Makeover Mission
The transformation journey had three critical phases that took this space from mundane to magazine-worthy:
Phase 1: Surface Prep (The Bit Everyone Wants to Skip)
Here's where most DIYers go wrong – rushing straight to the pretty stuff. But proper preparation is what separates a professional-looking installation from something that screams "weekend warrior."
First came the waterproof cement sheeting – creating a completely flat, moisture-resistant foundation. This step alone took a full day but made everything afterward significantly easier.
Game-Changing Tip #1: Paint Everything BLACK

When our installers pulled out the black exterior paint, there were some raised eyebrows. Black? In an already dark corner? Trust the process.
This step is absolutely non-negotiable. The black background does what nothing else can:
- Makes any tiny gaps between panels virtually disappear
- Creates the illusion of infinite depth behind the greenery
- Prevents any glimpse of the original wall from breaking the illusion
- Makes the green tones pop with striking contrast
A common mistake is using grey or leaving the original wall colour visible – both instantly give away that your "green wall" is just panels stuck to a surface.
Phase 2: The Light Show Setup

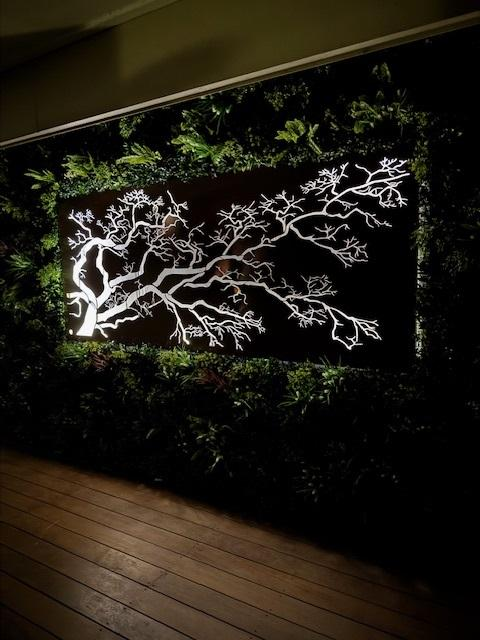
Before attaching a single green panel, we tackled the lighting elements – specifically, installing a stunning LED wall artwork as the wall's centerpiece.
This required:
- Precise measuring for perfect centering
- Running weather-rated electrical connections
- Creating mounting points that would allow the artwork to "float" slightly off the surface
- Testing various lighting temperatures to find the perfect complementary glow
Pro Tip: Most lighting installations fail because they're treated as an afterthought. By integrating lighting from the beginning, everything from wiring to positioning works harmoniously with the green panels.
Phase 3: Bringing the Green to Life

With prep work complete and lighting elements ready, it was time for the Designer Plants’ Lush Spring panels to take center stage.
Installation followed our proven approach:
- Starting from the bottom center (working outward ensures symmetry)
- Using marine-grade stainless fixings (regular screws will rust and stain your panels)
- Offsetting panel edges to break up obvious grid patterns
- Creating subtle height variations to mimic natural growth patterns
Installer Insight: On hot days, leave panels in the shade for an hour before installation. Heat-expanded panels can create gaps when they cool and contract.
The Results: Two Spaces in One
The transformation wasn't just dramatic – it created essentially two completely different outdoor experiences:

By Day: The wall became a lush, textured backdrop that visually cooled the entire space. The varied foliage of our Lush Spring panels created natural-looking depth, with different shades catching sunlight throughout the day. The black background completely disappeared, making the greenery appear to grow organically from the wall itself.

By Night: As darkness fell, the LED activated in the wall art, creating an entirely different atmosphere. The warm glow highlighted every texture in the surrounding panels, casting intricate shadows and giving the whole installation a magical, three-dimensional quality. What had been a cooling visual element during the day became a mesmerising focal point after dark.
Hard-Earned Tips for Your Own Project
If you're inspired to create your own day-to-night green wall transformation, these real-world tips will save you headaches:
Preparation Essentials
1: Mind Your Measurements: Measure your wall three separate times before ordering panels. Include allowances for borders, lighting elements, and any obstacles like power points.
2: Weather-Check Your Timeline: Avoid installation during extreme temperature days. Materials expand and contract, potentially creating gaps or buckling when temperatures normalise.
3: Create a Mounting Strategy: Different wall materials require different mounting approaches. Concrete needs masonry screws, timber allows for standard screws, and rendered surfaces may need special anchors.
4: Pre-Paint Panel Edges: For truly seamless results, use black spray paint on panel edges before installation to eliminate any glimpse of the manufacturing colour.
Lighting Wisdom
5: Wiring First, Always: Run all electrical before any panels go up. Retrofitting is a nightmare that usually requires removing and potentially damaging panels.
6: Consider Colour Temperature: Warm white (2700K-3000K) lighting complements green tones better than cool white, which can make artificial plants look obviously fake.
7: Layer Your Light Sources: Combine uplighting from below, backlighting from centre elements, and occasional spotlighting for the most professional effect.
8: Think Beyond On/Off: Smart lighting systems let you create different moods – bright for entertaining, subtle for relaxed evenings, and everything in between.
Installation Secrets
9: The Quarter-Panel Rule: Start with a complete panel in the centre bottom, then work outward. Never have cut panels in corners or at focal points.
10: Create Depth Through Offset: Occasionally mount a panel slightly proud (2-3mm forward) of adjacent panels to create natural-looking depth variation.
11: Mind the Gaps (Or Lack Thereof): Australian weather demands minimal gaps between panels – aim for 1-2mm maximum to allow for expansion while maintaining visual continuity.
12: Stagger Your Seams: Avoid creating obvious horizontal or vertical lines where panels meet. Staggered installation patterns disguise the modular nature of the wall.
The Honest Truth About Maintenance
One of the major selling points of our artificial green walls is their minimal maintenance compared to living walls. But "low maintenance" doesn't mean "no maintenance." For optimal longevity and appearance:
- A gentle spray with the garden hose every couple of months removes dust and cobwebs
- In areas with heavy pollution or near busy roads, you might need to clean more frequently
- While our UV-resistant panels hold their colour exceptionally well, extreme Australian sun exposure will eventually cause some fading (though this typically takes years)
- Occasionally, check the security of your panels, especially after extreme weather events
The good news? This minimal maintenance routine takes about 15 minutes per quarter – vastly less than living walls that demand constant watering, pruning, feeding, and plant replacement.
Beyond Beauty: Functional Benefits
The transformation delivers benefits far beyond pure aesthetics:
- Creates natural sound dampening for quieter outdoor entertaining
- Reduces ambient temperature around the wall area by up to 3°C
- Provides privacy without creating a claustrophobic enclosure
- Gives outdoor spaces the premium resort feel that boosts property value
- Transforms the way you use your backyard, encouraging actual outdoor living
The Ripple Effect
What surprised our clients most wasn't just how the wall looked – it was how it changed how they used their outdoor space.
This is the transformation we live for at Designer Plants. Not just changing how a space looks, but how it feels and functions. From a neglected concrete eyesore to the heart of family life – that's the real value of what we do.
We believe your backyard deserves better than that blank wall you've been tolerating for years. The combination of our premium Lush Spring panels with thoughtful LED wall art didn't just cover an ugly wall – it created an entirely new outdoor experience that evolves from day to night, season to season, year after year.
This transformation exemplifies how the right artificial green wall solution can completely reinvent your relationship with your backyard, creating a space you'll actually use and enjoy, no matter what time of day or night.
Ready to transform your own backyard wall from eyesore to outdoor masterpiece? Browse our full range of artificial green wall panels.